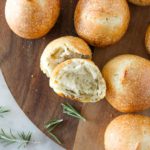
Rosemary Sourdough Rolls
Ingredients
Levain Build:
- 73 g All-Purpose Flour
- 91 g Water
- 8 g Yesterday’s starter
Final Dough:
- 624 g Bread flour AP such as King Arthur’s will work fine
- 29 g Milk
- 350 g Water
- 15 g Kosher Salt
- 172 g Liquid Levain above
- 57 g Olive Oil
- 6 g Fresh rosemary picked and chopped.
Instructions
Mix the Liquid Levain:
- The 12 to 14 hours before you want to mix your dough, build the levain. In a clean container mix the flour, water and starter. Stir with a small spatula until the water has hydrated the flour. With this small of a quantity I find it easier to double the amount of the levain build, so that there is room for waste and you have enough to make your dough and enough to feed for tomorrow!
Make the Final Dough:
- Combine bread flour, water, milk, salt and levain in the bowl of a stand mixer fitted with the paddle attachment. You can also incorporate the ingredients with a dough hook but it will take longer. Once the flour has been completely incorporated, let the dough sit for 15 minutes covered with plastic wrap (autolyze) to develop gluten.
- Switch to the dough hook and turn the mixer up to medium speed to develop the gluten. With a dough that has this amount of water, it will be difficult to develop all the gluten in a home stand mixer, so mix until you see strands forming on the top and the dough looks like it is pulling away from the sides of the bowl. This dough will not form a ball around the hook because it is too wet of a dough (this is what we want!).
- Reduce the mixer to low and slowly add the olive oil and the rosemary. Mix on low until all the oil has been absorbed into the dough. The dough should no longer look greasy. It will be smooth and silky looking.
- Scoop dough into an oiled bowl and cover with plastic wrap.
- Place in a warm spot for 45 minutes.
- Set of folds: Fold each of the four sides into the center, pulling the dough up and allowing it to smack down on top of the remaining dough in the bowl. This is developing more gluten!
- Bulk Proof: Cover the dough and place back into the warm spot to proof. Check the dough every 45 minutes. This will take about 2.5 hours. You want to oil or flour your hand and feel the dough. It should feel light and airy and not stiff or dense.
- Pre-shape: Dust the top of the dough in the bowl with flour. Turn the dough out onto a lightly (I mean lightly!) floured surface.
- Divide the dough into 16 equal pieces (75g each). Take each piece, fold in half and then place seam side down on the counter. Roll in the palm of your hand into a ball. If you have too much flour on your surface the dough will not tuck into itself. Scrap the excess flour away with a bench scraper if needed. I suggest you watch my youtube video. Once you have a round ball with a smooth top, repeat will all the balls. Cover with plastic wrap and allow it to sit and bench rest for 15 minutes.
- Final Shape: Repeat the same process as with the pre-shape. Place the dough on a parchment lined sheet pan or a greased rectangular baking dish. Cover with plastic wrap.
- To bake same day: Place the basket back into the warm spot and allow to rise another 1-2 hours or until it feels light and airy and they have doubled in volume. The volume will be tough to tell if you are proofing it on parchment because it doesn’t contain or control the shape of the sourdough. Proceed to the baking step below.
- To bake next day: Place covered basket into the refrigerator to retard the dough overnight. This will slow the proofing of the yeast and will allow you to bake 12-18 hours later.
- Baking: Preheat the oven to 425F convection.
- To easily score rolls, I use kitchen scissor to snip the top. You can also score with a lame or sharp knife.
- Bake rolls in preheated oven for 20-25 minutes or until nice golden brown on the outside.
- Allow to cool completely. This allows the crumb to set.
- Enjoy!
Notes
Sometimes I will make extra rolls (double this recipe in my 6 qt mixer) then when they are completely cool I will freeze them in ziptop freezer bags. I can then take out slices as I want them! I refresh them in the oven before serving which recrisps the crust!